Difference between revisions of "Editing Account Details"
Jump to navigation
Jump to search
Paul Chapman (talk | contribs) |
Paul Chapman (talk | contribs) |
||
| Line 4: | Line 4: | ||
<span style="color:#2E5894">'''>> To edit individual [[Account Information|account details]]:''' | <span style="color:#2E5894">'''>> To edit individual [[Account Information|account details]]:''' | ||
| − | 1. <span style="color:#2E5894">Enter editing mode by clicking on the pencil icon to the right of the data field to be edited. A text box will appear containing the existing text along with tick mark and diagonal cross icons. | + | *1. <span style="color:#2E5894">Enter editing mode by clicking on the pencil icon to the right of the data field to be edited. A text box will appear containing the existing text along with tick mark and diagonal cross icons. |
| − | 2. <span style="color:#2E5894">Click in the text box and edit text as required. | + | *2. <span style="color:#2E5894">Click in the text box and edit text as required. |
| − | 3. <span style="color:#2E5894">After editing the text click on the tick mark icon to exit editing mode. At this point edits can be discarded by clicking on the diagonal cross. | + | *3. <span style="color:#2E5894">After editing the text click on the tick mark icon to exit editing mode. At this point edits can be discarded by clicking on the diagonal cross. |
| − | 4. <span style="color:#2E5894">Edited text will appear in red (at this point your changes have not yet been saved). | + | *4. <span style="color:#2E5894">Edited text will appear in red (at this point your changes have not yet been saved). |
| − | 5. <span style="color:#2E5894">To save changes click on the save button in the bottom right corner of the invoice details control. | + | *5. <span style="color:#2E5894">To save changes click on the save button in the bottom right corner of the invoice details control. |
| − | 6. <span style="color:#2E5894">If the edit has been successful the new value will appear onscreen in black text next to a pencil icon. No red text or save button will be visible. | + | *6. <span style="color:#2E5894">If the edit has been successful the new value will appear onscreen in black text next to a pencil icon. No red text or save button will be visible. |
</span> | </span> | ||
'Note: It is possible to edit more than one field before committing changes to be saved. | 'Note: It is possible to edit more than one field before committing changes to be saved. | ||
| − | <span style="color: Red"> '''TIPS:''' | + | <span style="color: Red"> '''TIPS:''' Remember to click the tick mark icon to exit edit mode before attempting to edit another field. And ALWAYS remember to save changes before leaving the [[Account Information|account details]] control. |
[[Account Information|Parent]] - [[Configuring Ellserve]] - [[Ellserve:Ellserve|Home]] | [[Account Information|Parent]] - [[Configuring Ellserve]] - [[Ellserve:Ellserve|Home]] | ||
Revision as of 08:01, 3 October 2013

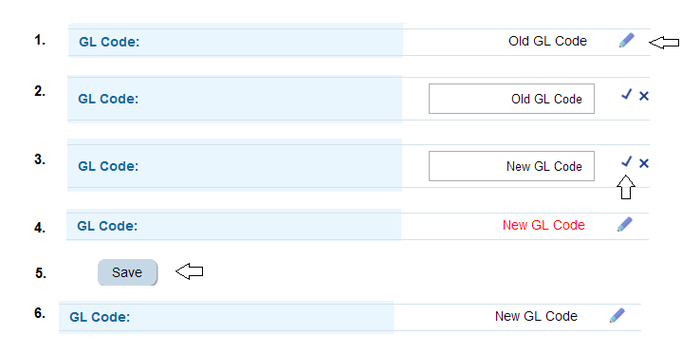
>> To edit individual account details:
- 1. Enter editing mode by clicking on the pencil icon to the right of the data field to be edited. A text box will appear containing the existing text along with tick mark and diagonal cross icons.
- 2. Click in the text box and edit text as required.
- 3. After editing the text click on the tick mark icon to exit editing mode. At this point edits can be discarded by clicking on the diagonal cross.
- 4. Edited text will appear in red (at this point your changes have not yet been saved).
- 5. To save changes click on the save button in the bottom right corner of the invoice details control.
- 6. If the edit has been successful the new value will appear onscreen in black text next to a pencil icon. No red text or save button will be visible.
'Note: It is possible to edit more than one field before committing changes to be saved.
TIPS: Remember to click the tick mark icon to exit edit mode before attempting to edit another field. And ALWAYS remember to save changes before leaving the account details control.